Laser Cutting
LASER CUTTING
The first practical and its already a dream come true for my CPDD journey and that issssss LASER CUTTING. 🔦
Let's look at the different types of laser cutters available in Fablab:
Understanding Laser Cutter
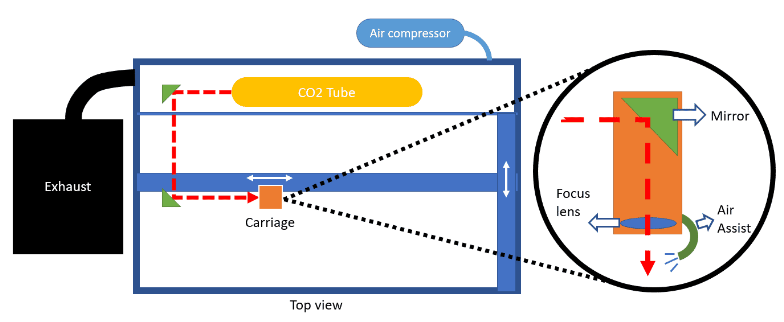
How does laser cutter work?
- The laser beam is created in a tube filled with carbon dioxide gas.
- Mirrors and lenses are used to direct laser bean to the laser head and focused on the material surface.
- Air assist is from the compressor which helps to prevent flare ups and keeps things clean by directing vapourised material downwards away from the cut and away from the machine's lenses and mirrors.
Vector or Raster?
- Vector: Vector graphics are rendered by a computer using mathematical formula. Hence they are crisp and sharp
- Raster: Raster images are made up of tiny coloured pixels
Here's a photo for comparison
As we can see (or hear) from the name, "cutting" is part of the name and when it comes to "cut" ✀ its dangerous❗. Laser cutting area is not a place to horseplay.
1. These are the 4 important hazards and the respective safety control measures on the operation of laser cutting machine:
Besides the hazard, we should also know what are the materials that can be cut or engraved using laser cutting machine in Fablab. Using inappropriate material can cause fire to arise. beeebooobeeboo🚒🧯
2. Below are the materials that can be cut/engraved using laser cutting machine in Fablab.
Note: the allowed material thickness for cut is maximum 5mm
So, now the question is, HOW do we use a laser cutter (specifically the UNIVERSAL laser cutter):
3. Below are the steps on the operation of UNIVERSAL laser cutter machine in Fablab:
a. Starting the compressor, turning on the laser cutting machine and fume extractor
b. Importing a .DXF file to coreldraw and modify the lines/fill for cutting and engraving
c. Sending the coreldraw drawing to laser cutter software and setting the laser cutter power, speed, PPI in the software
d. Starting the job on the laser cutter machine
e. DOs and DONTs when there's flame/fire on the material being cut
4. Below is my learning reflection journal on the laser cutter activities.
Woah, the competency test at first was a little intimidating however after knowing I passed, I am sure I am competent to operate it by myself. Using coreldraw was rather simple as it is just like using power point slides. 😱😓
Laser cutting helped me to ignite the flame in Diploma in Chemical Engineering as it's something I like to do. Especially seeing the product being cut or engraved. With this skills, I am able to use it during internship, work or even my own personal items such as engraving the things I want. yeehheee
After preparing the SOP for so many days and making sure I wrote down every piece of information, regardless, experience is still needed as we may know what to do or know where to find that thing in a software that we have never used before. Thankfully for the resources provided by Dr. Noel where it shows the simple navigation through a video and that helped me to prepare more for the competency test and I'm pretty sure I've watched the video more than 10 times.
Even with passing the competency test, there are still other area that I am lacking. Dr. Noel taught us a new way to save time during the competency test, which is to select the whole thing and change it to RBG green and hairline, then select outline and change to red. With this method, instead of selecting the inner sections one by one, it can save a lot of time especially during the competency test cause every second is important. ⏱
Laser cutting is fun as I don't even need to wait long for the product to be formed, it literally just took 10 seconds or less which is mind blowing. With this new knowledge, I wouldn't just need to stick to 3D printing but there's also another option which is laser cutting. This open way to more opportunity and design that I can make during CPDD protoyping. Here's what I made during the competency test.😵
Additional notes on using laser cutter:
Using UCP:
1. Zoom- scroll on the mouse to zoom in and out
2. Focus view (laser pointer)- click on any space of the area, it will be shown on the material by the laser to check if it is within the safe zone
3. Relocate- move your object within the plane on screen (to save material, best to start from x:0.5mm, y:0.5mm)
4. Estimate view- click on start and it shows how long is the cut
If want to relocate the object to the last laser pointer point, press on "relocate" and select the corner where the object to be relocated and then press "pointer".
The power should not gone beyond 50% as it will be too strong and will waster alot of energy and power.
The cut should be done in a slow speed to cut through material that is too thick.


Comments
Post a Comment